Let's create a grain
Notice that you are working through Zones of Meta-information which helps the system organise the grain.
Zone 1 IDENTITY
1. Create an Acronym which is consistent with the area of study
2. Write the Name/Title of the grain

- Write a short Summary or synopsis of the material in the grain to identify for the reader if it is of interest to them. Write it in a manner which excites interest and brings the topic alive.
Zone 2 CONTENTS
Paste in the Contents from your original file document and use the tool bar to format it as you need. You can include charts and diagrams and photos and links where necessary. These items are separate from any fruit you may wish to attach later.

Instructions for including other files inside the content
For technical reasons Zone 2 appears unhighlighted after Zone 3. This is of no consequence.
Zone 3 GRAIN TO GRAIN LINKS
Define the grain to grain relationships. You have a choice between 5 options displayed. This indicated pre or post knowledge elements. This helps the learner to know what is prerequisite knowledge and what is a little deeper.
Grain relationships show knowledge relationships between key portions of information. They range from 3 cross-connections per grain to a maximum of 20 relationships. These relationships offer the learner an opportunity to deepenand broaden their knowledge in a particular area. Decide on the category of relationship with the next grain.
You can create the pedagogical link by filling in the name of the grain which will partner what you have just created.

Start typing and a list will appear – click on the name to select it. (example of the list at right)
Zone 4 LANGUAGE
- Define what language the grain is in. It doesn’t matter if it is in a different language to others in the same Area or Module. This will automatically crate a cross-language link if the two items are in differing languages.
Zone 5 Fruit
All fruits are stored in a fruitbowl. A list of them can be found via the menu on Admin Dashboard
- Label and attach the Fruit which, you will recall, are supporting files - slideshow presentations, video etc via hyperlinks.
- Enter the hyperlink to where the fruit file is stored on your system.

- You can source and reference fruit already on the system by clicking the search icon on the right-hand side of the fruit field.
- A list will be displayed
ZONE 6 technical information
Provide Technical Information such as what software application might be needed to see all aspects of the grain eg Flash, HTMK

ZONES 7 and 8 cannot be seen at this stage because the grain is not finished yet and is not organised in a Module or Area or Pathway.
ZONE 9 Sources
The next field is a free field and refers to the Source of the material. Provide a short summary on who wrote it, their background and anything else about them that might be relevant, but do not use this as a bibliography or references.
Creation date and last revision date means enter historical data (date of first creation, date of last revision and by whom).

ZONE 10 CONDITIONS
Rights and obligations (as part of the Conditions zone) should normally be covered by the general disclaimer. However, if there are particular restrictions or instructions regarding the use of this material it should be stated here
ZONE 11 FEEDBACK
Now you enter the Email address of the person who will handle any correspondence relating to that grain. You can also log a message to future administrators of the grain to explain any revisions if necessary. Click SAVE.

ZONE 12 other
This zone is not currently in use and is not visible.
Instructions for including other files inside the content
Websites operate differently to printed documents; therefore, transferring information in various forms from a word document to site content is not straightforward and requires a little extra effort in organising the materials.
This site offers two means of inserting visual elements into the contents field of a grain, one using the attached file method and the other via a database where you would be more active in creating URLs for files yourself. Regardless of which method you choose, you will need to create a file of images which can be located by the system and inserted into the grain content.
- Create image library
- Prepare to embed image in grain content field

- Click on File attachments and this provides an opportunity to embed an image file into the grain content.
- Click on ‘Parcours’ and select the file on your computer that you wish to embed. Note: files that are embedded in your original word document will not appear. They must be individually inserted.
- Click Attach and the file attachment with its URL will appear.

- Copy the file attachment URL (see blue highlighted section)
- Find the place in the content where you want to embed the file and click on it
- Click on the image icon in the content toolbar

- A pop up will open and you paste the URL into this, click OK.
- Here is your image inserted into your content. Text wrap is not an available tool but you can choose to centre items if you wish. Make sure you SAVE, otherwise all your links will disappear .
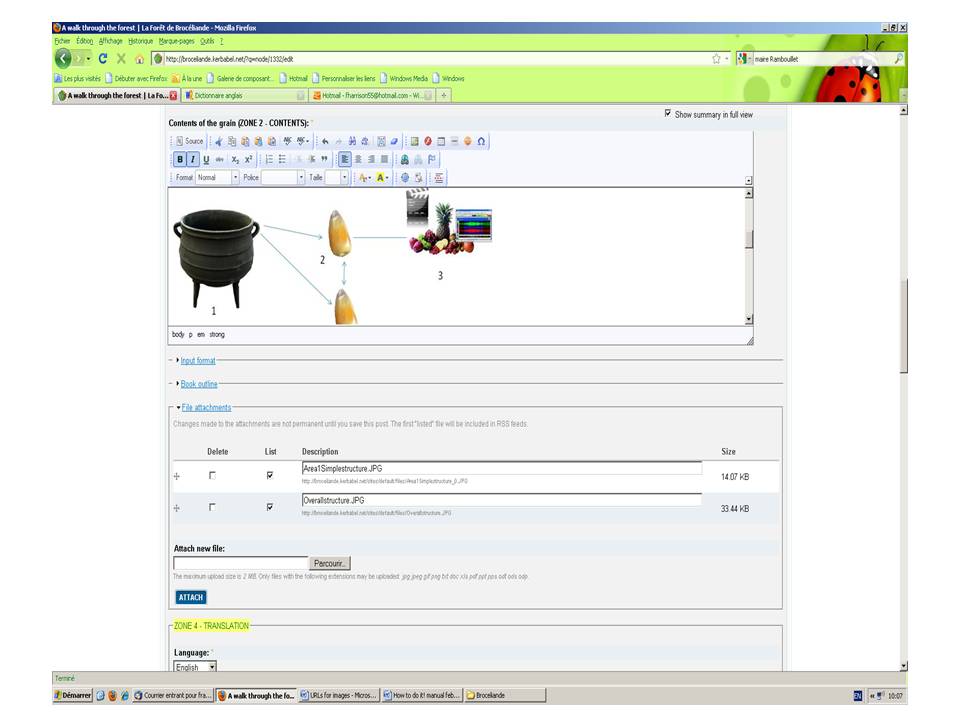
So that’s the first method. The second method uses the CK Editor facility and is as follows:
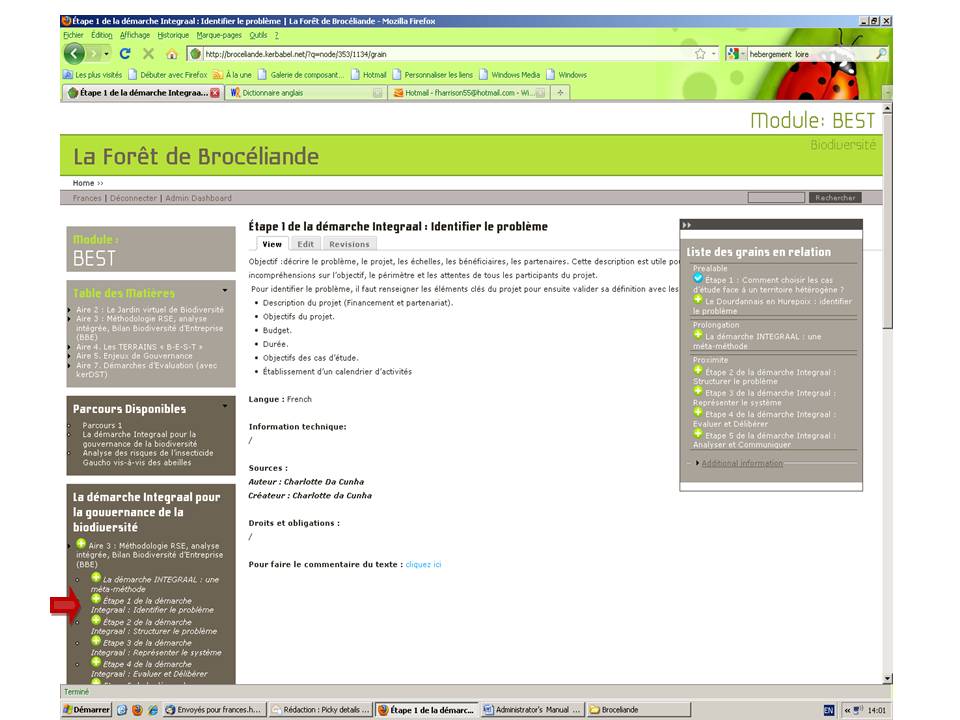
How the grain will appear when completed
- You will see the content of the grain itself in the middle of the page as text with or without graphic elements.
- On the left you will see a Table of Contents like a book showing chapters and grains. You can use the links to navigate in an orderly fashion this way
- You will see recommended pathways. In these you will be guided in the selection and order of study materials
- On the right you can see a menu for accessing additional materials- be they fruit or other related grains, even related grains in other languages.
Below is an example of a grain in BESTmodule on the second pathway listed. The grain is located in Area 3 and we can see a list of related grains on the right-hand side. That list can be collapsed to facilitate reading of the grain text. Note that graphics have been included in the text.

The pathway you are on tells you where to go next. In this case the pathway now suggests we visit this…

We click on Etape 1 de la demanche….. and we are at the next scheduled grain with related grains (on the right)